Help:Adding items
Mods that deal with items will often edit items that already exist in the game. However, this can lead to conflicts between mods, so it is generally advised to make a new item, instead. This tutorial will cover all of the steps needed to add new items.
Two methods are provided. Using BotW Actor Tool is much simpler, but it is in a beta state and may have bugs.
Required tools
Adding new items requires several tools, most of which are described and are available here.
Both methods require the following:
- Python 3.7 (64-bit) or Python 3.8 (64-bit) is necessary for just about every tool.
- Switch Toolbox
- BOTW Cross-Platform Mod Loader (or
bcml) [CLI help]
The new method requires:
- BotW Actor Tool [CLI help]
The old method requires:
- A text editor like Notepad++
- Wild Bits [CLI help]
- Hyrule Builder [CLI help]
- BOTW Flag Utilities [CLI help]
Using BotW Actor Tool
Creating a mod directory
The folder structure is important, as BotW will only load files if they're in a certain location. To begin with, you will want to create a folder structure that looks like this:
- BreathOfTheWild_[MyAwesomeModName]
- content
- Actor*
- Pack*
- Model
- Pack*
- UI
- StockItem
- Actor*
- content
Starred folders will be created by the actor tool if they don't already exist. Note that the folder names are case-sensitive.
Setting up the tool
Open a command prompt (WinKey + R, enter cmd) and use the command botw_actor_tool to open it.
If this is your first time using the actor tool, set your paths in the settings menu. If you set them wrong, the tool will warn you. They should be set as follows:
- Game directory should be the content folder of your base game dump. Example:
C:\Games\BotW\basegame\content - Update directory should be the content folder of your update dump. Example:
C:\Games\BotW\update\content - DLC directory should be the 0010 folder of your DLC dump. Example:
C:\Games\BotW\DLC\content\0010 - Language should be set to the region and language you use. For example, USen is for United States English, while EUes is for European Spanish.
Opening the base actor
Use File -> Open Vanilla Actor to open a list of all actors from vanilla BotW. Pick the actor from the list that most closely matches your new desired item. (e.g. if you want to create a wooden shield, you would pick an actor for one of the base game's wooden shields).
Use https://github.com/MrCheeze/botw-tools/blob/master/botw_names.json for help finding item
Once the tool has loaded the actor data, click on the Model button in the Actor Property box at the top, then scroll to the bottom. There should be a single line that says Folder. Take note of what it says after that, as that is the name of the sbfres file that you will need in #Creating your item's resource files. Then switch back to the Actor Link tab by clicking on the Actor Link button in the Actor Property box.
The Actor Link tab
The Actor Link tab contains the name of your item, the names of the unique files your actor uses, plus some other tidbits. Click on the Actor Name field, and change the name to whatever new name you want, then hit the Apply button to the right of that text field.
Make sure your item's tags (at the bottom) are correct. The tag for a dyable armor is ArmorDye, the tag for a weapon that can have a picture taken for the compendium is ZukanWeapon, anything that can be equipped has the tag CanEquip, etc. If you make a change, make sure to hit the Apply button to the right before moving on.
The General Param tab
This tab contains most of the information about the stats of items. For example, a weapon/shield's durability, a weapon's damage, a shield's block rate, an armor's defense, an armor's set (and therefore set bonus) are all stored here. You may want to change some of these things. A comprehensive list of the things that can appear in this tab is available here. Commonly changed parameters include: Life (the durability of the item, in the General category), Power (a weapons' damage, in the Attack category), DefenceAddLevel (an armor's defense rating, in the Armor category)
If your item is an armor that is upgradable, change the line that says NextRankName: !str64 [ActorName] to the actor name for the actor that this one upgrades into. (In game terms, "upgradable" means via the Great Fairies. If your armor is not upgradable, put !str64 "")
Make sure to click the save button at the bottom before moving on.
The Model tab
On this tab, there will be a line toward the bottom that says Folder:.
If your item is an armor piece, this may not match your new armor name. Be sure to check, and change it, if necessary. Note that, if you do need to change it for an armor, you should not include the _Head, _Upper, or _Lower as part of the new Folder.
Whether or not your item is an armor piece, take note of what the Folder field now says. This will be the name for your resource files.
If you changed anything, make sure to click the save button at the bottom before moving on.
The Texts tab
This tab contains the entries for what text will be shown by the game.
- If your item is a cookable that has more than one recipe result (like a mushroom skewer) then you should set the BaseName to what you want displayed for its name. Otherwise, the BaseName is not used.
- Set the Name to what you want your item to be named.
- Set the Desc to what you want the inventory to display as the description of your item, when you select it.
- If your item can have a picture taken of it and be put in the compendium, set the PictureBook to field to what you want the compendium summary of the item to be. This is often a copy of Desc.
Again, if you changed anything, make sure to click the save button at the bottom before moving on.
Saving your item
Click File -> Save, and then pick the content folder you created in the #Creating the mod directory step. The tool should freeze for a little less than 10 seconds while it packages all the item's data and saves all the necessary files. This should properly create Actor/ActorInfo.product.sbyml, Pack/Bootup.pack, Pack/Bootup_XXxx.pack (where XXxx is your region/language), and your item's sbactorpack file.
Creating your item's resource files
You'll need to copy the resources for the original item that you're modifying to your mod's content\Model folder. You will find the original resource files in your dumped UPDATE files (not the base game files), in the same location. (content\Model) The files you're looking for are the ones that whose names match the Folder field you took note of during the #Opening the base actor step. There should be two files, one with an sbfres extension (the model) and one with a Tex.sbfres extension. If you are modding for WiiU or Cemu, there are actually three files you will need: sbfres, Tex1.sbfres, and Tex2.sbfres. If Tex1.sbfres is not present in your UPDATE files, you will need to find it in your BASE GAME dumped files. This is the case for most, if not all, vanilla (non-DLC) items.
Once you have copied the old files to the new location, you need to rename them to whatever it said in the Folder field you took note of during #The Model tab step.
The bulk of the model replacement and texture replacement is explained in the tutorials linked there. Once you've used those tutorials to replace the bulk of the data, we can change the names that BotW uses to refer to that data. All the rest of this section assumes that you have both sbfres files for your actor open in Switch Toolbox. (If on WiiU, you don't need to open the Tex2 file. Switch Toolbox will read its data whenever you open the Tex1 file, as long as they are in the same folder.)
The first thing to change is the bfres name. This did not happen automatically when you renamed the file. You can do this by clicking on the orange file labeled "FRES" on the left side, clicking on the name on the right side, and changing it.
Some important terms in modeling:
A "model" is the 3D data for a whole actor. The models are everything that is inside the Models folder inside the sbfres file.
An "object" is the 3D data for a piece of an actor. The objects are everything that is inside the Objects folders inside the Models folder.
A single model will be made up of one or more objects.
A "material" is the data the game uses to "paint" a model, so that it knows what color it is, how it reflects light, whether or not it's shiny or dull, etc. The materials are everything that is inside the Materials folders inside the Models folder.
A "texture" (or "map") is a single picture that contains color, light reflection, metallic, or other data for a material. Textures are contained separately, in the Tex.sbfres file. (Tex1.sbfres for WiiU/Cemu)
A material will consist of one or more textures, plus shader data. (The author of this tutorial doesn't even really understand shaders. Sorry.)
Each model will contain one or more materials. Each object will be assigned one material. A single material may be assigned to any number of objects.
The name of the model (inside the Models folder) is important, as the game will not load the actor if the model name doesn't match your item's actor name as you entered it in the actor tool! Object names can be arbitrary, but they generally follow the rule: [ObjectName]__[MaterialName] where [ObjectName] is whatever you want, and [MaterialName] is the name of the material assigned to it. Adhering to this naming convention is encouraged, so that if anyone else ever tries to reuse your files, they can make sense of them.
Click on the model name on the left side that you need to change. On the right side, near the top, the model name will be displayed. Click on that to edit it, and change it to your new mesh name that you used in the actor pack and actor info files. If successful, it will also change on the left side.
You may also change the names of the objects and materials in the same way.
When changing the names of the materials, on the right side, there will be a tab labeled Textures that will be selected by default. It will contain the names of all the textures being used by that material, and these will all be the names of the old textures. Switch over to the texture sbfres now, and change all the textures to names that fit your new actor.
When you are done changing all the names of the textures, switch back to the model sbfres and look at the Textures section of the material. Click on one of the entries in the table (for example, [OldModelName]_Alb) and then click on Edit. A new window will pop up, with a list of all the textures contained in the texture sbfres. Choose the one that corresponds with the new texture (for example, [NewModelName]_Alb or [NewModelName]_Alb.0) and click save. Do this for all the entries in the Textures table for this material, and then repeat the process for every other material.
If you are editing an armor that is dyeable, you then need to expand the Animations folder on the left, then Texture Pattern Animations, then right-click the folder that corresponds to your item (Head for the head, Upper for the torso, Lower for the legs). Select Export, select to save as "Yet Another Markup Language" (or YAML Ain't Markup Language, if it's been since changed to the official name) and save it somewhere. Open the new yaml file that you just saved in a text editor. You will need to edit all the texture and material names to the new ones. For example, changing [OldModelName]_Alb.0 to [NewModelName]_Alb.0 and [OldMaterialName] to [NewMaterialName] (e.g. Mt_Hood_001 to Mt_Hood_9001). Save it, then, back in Switch Toolbox, right-click on the folder inside Texture Pattern Animations that corresponds to your item, and select Replace. Select the yaml you edited.
When you are done, select any file or folder from the model sbfres, in the list on the left, and save it. Switch Toolbox will ask if you want to Yaz0 compress the file, click Yes. Then click on any file or folder from the texture sbfres, in the list on the left, and save it. Switch Toolbox will again ask if you want to Yaz0 compress the file, click Yes. If you are editing a WiiU texture sbfres, it will then ask you to save the Tex2 sbfres, so save it and Yaz0 compress it, as well. And that's it, you are done with the files that tell the game what the new item looks like.
Creating an inventory icon
This section covers the inventory icons, the square images you see in the inventory grid in the pause menu. These files are kept in content\UI\StockItem for inventory items. Copy the old sbitemco file for the item you are using as your foundation, to the same location in your mod files (content\UI\StockItem). An sbitemco file is pretty much the same thing as an sbfres for textures, so you will edit it the same way, using Switch Toolbox. Make sure to change the name of the file to [NewActorName].sbitemico, the name of the file it contains in Toolbox to [NewActorName].bitemico, and the texture it contains to [NewActorName]
Note: You can also very easily creating your own icon from a png using this tool.
Installing the mod
And now you are done! Basically! Use the directions located here to make a rules.txt if you haven't already. To use the mod, open bcml via command prompt (just run the command bcml) and click the blue circle in the bottom right. Then select Browse, select the rules.txt inside your BreathOfTheWild_[MyAwesomeModName] folder, and click Install. Wait for it to install, and you're ready to play the game with your new item!
Using text editors and WildBits
Before we begin
Do not skip this section, it is very important.
This tutorial will use several terms that you may not be familiar with, or will have specific definitions you may not have used before:
- File name (or FileName) - the name of a file. For example, for the file
Armor_001.sbfres, the FileName isArmor_001 - File extension (or FileExtension) - the type/extension of a file. For example, for the file
Armor_001.sbfres, the FileExtension issbfres - Actor name (or ActorName) - the code name of the item, and the FileName of the actor pack. For example, the Hylian Tunic is
Armor_001_Upper. bfresname (or BfresName) - the code name of the resource files containing the model and texture data for the actor, and the FileName of thebfresfor an actor. For example, the Hylian Tunic is part of the Hylian Set and all Hylian Set resources are contained insideArmor_001. In general, an armor's BfresName is the first two parts of its ActorName (e.g.Armor_001out ofArmor_001_Upper). This tutorial usessbfresandbfresmostly interchangeably, but you can think of ansbfresas a ZIP archive that contains abfres.- Model name (or ModelName) - the code name of the model inside the resource files to be used. In almost all cases, this is the same as the ActorName. The only exceptions to this are for head armor models that have a mantle variant, like
Armor_001. Their ActorName will end in_Head, and their ModelName will end in_Head_A. - Old - if something is referred to as "old," that means any files you are using as the base files for your new item. For example, if you are creating a new shield that performs similarly to
Weapon_Shield_001(is a shield, is wooden, etc.) and you were copying its files to your mod, thenWeapon_Shield_001would be the "old" actor name. - New - anything that refers to the new item you are making. If something is not referred to as "old" or "new," then it is new. For example, if you are making
Armor_9001_Headthen that will be referred to as either the NewActorName and the ActorName.
Vanilla weapons have the same name as their actor, model, and bfres names. For example, the actor Weapon_Sword_001 has the model name Weapon_Sword_001 and its resource files are in Weapon_Sword_001.sbfres.
Note that anytime brackets are used, this means that whatever is inside the brackets should be replaced with something else. For example, Bootup_[XXxx].pack could be replaced with Bootup_USen.pack or Bootup_EUen.pack or other names. Do NOT leave the brackets in there. Another example might be [FileName].[FileExtension] which could be replaced with just about anything, like Weapon_Sword_001.bxml or Link.Tex1.sbfres. (Note that, in this case, "Link.Tex1" is the file name and sbfres is the file extension)
If you are ever told to open a Powershell window and run a command, you can do that by holding shift, right-clicking somewhere inside the folder and clicking on "Open Powershell window here." Anytime you do this, it will be to run a Python script.
Setting up your folder structure
The folder structure is important, as BotW will only load files if they're in a certain location. To begin with, you will want to create a folder structure that looks like this:
- BreathOfTheWild_[MyAwesomeModName]
- content
- Actor
- Pack
- Model
- Pack
- UI
- StockItem
- Actor
- content
Note that these names are case-sensitive.
Creating the actor
First, figure out what item (that already exists in game) behaves closest to your new item. Find the sbactorpack file for that item, and copy it to content\Actor\Pack. You will find the original file in your dumped UPDATE files (not the base game files), in the same location. (content\Actor\Pack) Make sure you copy it, and don't move the original.
Next, copy ActorInfo.product.sbyml to content\Actor in your mod files. You can find it in your dumped UPDATE files (not the base game files), in the same location. Make sure you copy it, and don't move the original.
Then, copy both Bootup.pack and Bootup_[XXxx].pack to content\Pack in your mod files. You can find them in your dumped UPDATE files (not the base game files), in the same location. There will be several Bootup_[XXxx].pack files. Each one is for a different region and language. For example, USen is for the US version, English language, while EUes is for the European version, Spanish language. Copy only the one(s) you will be making edits for, as any languages that you don't edit will have entries automatically copied into them by one of the later steps in the tutorial. For example, if you edit USen and EUes, EUen will receive your custom entries from USen, and USes will receive your custom entries from EUes.
Lastly, copy your resource files to content\Model (models and textures) and content\UI\StockItem (icons). These files aren't handled by the converter, they're explained more in depth in their own section of the tutorial.
Once you have your mod files assembled navigate to the folder that contains your BreathOfTheWild_[MyAwesomeModName] folder, open a Powershell window, and run the command hyrule_builder unbuild BreathOfTheWild_[MyAwesomeModName]. It will take a bit of time to convert the files, and then create a new folder called BreathOfTheWild_[MyAwesomeModName]_unbuilt, which contains the files you will be editing.
Editing the actor pack files
The actor pack files will be located in the various folders inside content\Actor. There will be certain parts of the files that you need to change. All instances of the old actor, model, and BFRES names will need to be changed to the new actor, model, and BFRES names. The following is a list of many of the changes that need to be made, but note that some of these may not apply to your item, and there are some changes that may not appear in this list. Be thorough when you look through the files for things that may need to be changed.

- File/Folder names:
- changing the name of the
[ActorName].bmodellistfile insidecontent\Actor\ModelList - changing the name of the
[ModelName].bphysicsfile insidecontent\Actor\Physics - changing the name of the
[ActorName].bxmlfile insidecontent\Actor\ActorLink - changing the name of the
[ActorName].bgparamlistfile insidecontent\Actor\GeneralParamList - changing the name of the
[BfresName]folder insidecontent\Physics\SupportBone - changing the name of the
[ModelName].bphyssbfile insidecontent\Physics\SupportBone\[BfresName] - changing the name of the
[BfresName]folder insidecontent\Physics\Cloth - changing the name of the
[ModelName].hkclfile insidecontent\Physics\Cloth\[BfresName]
- changing the name of the
- Inside
bmodellist:- changing the line that says
Folder: !str64 [BfresName]to the newbfresname - changing the line that says
UnitName: !str64 [modelName]to the new model name
- changing the line that says
- Inside
bphysics:- changing the line that says
support_bone_setup_file_path: !str256 [BfresName]/[ModelName].bphyssbto the newbfresand model names - changing the line that says
cloth_setup_file_path: !str256 [BfresName]/[ModelName].hkclto the newbfresand model names - Do not change anything with "Havok" in the name as those point to data inside the hkcl file which we cannot change. Physics should work fine without changing data inside the
hkclfile, as long as you do change the name of thehkclfile.
- changing the line that says
- Inside
bxml:- changing the line that says
ActorCaptureUser: [ActorName]to the new actor name - changing the line that says
GParamUser: [ActorName]to the new actor name - changing the line that says
ModelUser: [ActorName]to the new actor name - changing the line that says
PhysicsUser: [ModelName]to the new model name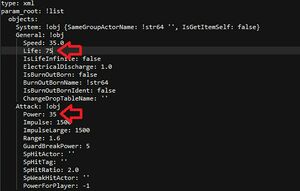
Example of two parameters commonly changed, inside the bgparamlist file.
- changing the line that says
- Inside
bgparamlist:- If your item is an armor that is upgradeable, changing the line that says
NextRankName: !str64 [ActorName]to the actor name for the actor that this one upgrades into. (In game terms, "upgradeable" means via the Great Fairies. If your armor is not upgradable, put!str64noting the extra space after the 4) - The
bgparamlistfile also contains most of the information about the stats of items. For example, a weapon/shield's durability, a weapon's damage, a shield's block rate, an armor's defense, an armor's set (and therefore set bonus) are all stored here. You may want to change some of these things. A comprehensive list of the things inside thebgparamlistfile is available here. Commonly changed parameters include:Life(the durability of the item, in theGeneralcategory),Power(a weapons' damage, in theAttackcategory),DefenceAddLevel(an armor's defense rating, in theArmorcategory).
- If your item is an armor that is upgradeable, changing the line that says

Once you've made your changes, make sure to save.
Adding the actor info
The previous step saw you creating the actual actor. This step is for creating the actor metadata that the game uses so that it knows your new actor exists. It also stores most data that appears in menus like the pause menu, crafting menu, or store menus.
Inside content\Actor\ActorInfo, you will find a file for each actor in the game. Find the one for the old actor that you are using as your base, and copy it, changing the name of the new file to [NewActorName].info.yml, then open the file in a text editor. Change the following lines:
bfres: [BfresName]to your newbfresnameitemUseIconActorName: [ActorName]should have the [ActorName] replaced with just "" if you're using your own icon, otherwise replace it with the actor name of the icon you'll be usingmainModel: [ModelName]to your new model namename: [ActorName]to your new actor name- Any additional information you changed in the actor pack that might be shown in any menu. For example, armor value of armor, defensive value of shields, damage of weapons, buying/selling price of items from/to a shop, crafting ingredients if the item is craftable, etc.
Once all the info is changed, make sure to save.
Creating the resource files
This section will cover the files that actually tell the game what the 3D model of the item looks like, in game. You'll need to copy the resources for the original item that you're modifying to your mod's content\Model folder. You will find the original resource files in your dumped UPDATE files (not the base game files), in the same location. (content\Model) The files will be called [OldBfresName].sbfres and [OldBfresName].Tex.sbfres. If you are modding for WiiU or Cemu, there are actually three files you will need: [OldBfresName].sbfres, [OldBfresName].Tex1.sbfres, and [OldBfresName].Tex2.sbfres. If [OldBfresName].Tex1.sbfres is not present in your UPDATE files, you will need to find it in your BASE GAME dumped files. This is the case for most, if not all, vanilla (non-DLC) items.
Once you have copied the old files to the new location, you will rename them to your new bfres name. Note that this name needs to match the bfres name you used when editing the actor pack files.
The bulk of the model replacement and texture replacement is explained in other tutorials. Once you've used those tutorials to replace the bulk of the data, we can change the names that BotW uses to refer to that data. All the rest of this section assumes that you have both sbfres files for your actor open in Switch Toolbox. (If on WiiU, you don't need to open the Tex2 file. Switch Toolbox will read its data whenever you open the Tex1 file, as long as they are in the same folder.)
The first thing to change is the bfres name. This does not happen automatically when you change the sbfres name. You can do this by clicking on the orange file labeled "FRES" on the left side, clicking on the name on the right side, and changing it.
Some important terms in modeling:
A "model" is the 3D data for a whole actor. The models are everything that is inside the Models folder of the [BfresName].sbfres file.
An "object" is the 3D data for a piece of an actor. The objects are everything that is inside the Models\[ModelName]\Objects folder.
A single model will be made up of one or more objects.
A "material" is the data the game uses to "paint" a model, so that it knows what color it is, how it reflects light, whether or not it's shiny or dull, etc. The materials are everything that is inside the Models\[ModelName]\Materials folder.
A "texture" (or "map") is a single picture that contains color, light reflection, metallic, or other data for a material. Textures are contained separately, in the [BfresName].Tex.sbfres file. ([BfresName].Tex1.sbfres for WiiU/Cemu)
A material will consist of one or more textures, plus shader data. (The author of this tutorial doesn't even really understand shaders. Sorry.)
Each model will contain one or more materials. Each object will be assigned one material. A single material may be assigned to any number of objects.
The ModelName is important, as the game will not load the actor if the ModelName here does not match the ModelName used in the actor pack files and actor info file! Object names can be arbitrary, but they generally follow the rule: [ObjectName]__[MaterialName] where [ObjectName] is whatever you want, and [MaterialName] is the name of the material assigned to it. Adhering to this naming convention is encouraged, so that if anyone else ever tries to reuse your files, they can make sense of them.
Click on the model name on the left side that you need to change. On the right side, near the top, the model name will be displayed. Click on that to edit it, and change it to your new mesh name that you used in the actor pack and actor info files. If successful, it will also change on the left side.
You may also change the names of the objects and materials in the same way.
When changing the names of the materials, on the right side, there will be a tab labeled Textures that will be selected by default. It will contain the names of all the textures being used by that material, and these will all be the names of the old textures. Switch over to the texture sbfres now, and change all the textures to names that fit your new actor.
When you are done changing all the names of the textures, switch back to the model sbfres and look at the Textures section of the material. Click on one of the entries in the table (for example, [OldModelName]_Alb) and then click on Edit. A new window will pop up, with a list of all the textures contained in the texture sbfres. Choose the one that corresponds with the new texture (for example, [NewModelName]_Alb or [NewModelName]_Alb.0) and click save. Do this for all the entries in the Textures table for this material, and then repeat the process for every other material.
If you are editing an armor that is dyeable, you then need to expand the Animations folder on the left, then Texture Pattern Animations, then right-click the folder that corresponds to your item (Head for the head, Upper for the torso, Lower for the legs). Select Export, select to save as "Yet Another Markup Language" (or YAML Ain't Markup Language, if it's been since changed to the official name) and save it somewhere. Open the new yaml file that you just saved in a text editor. You will need to edit all the texture and material names to the new ones. For example, changing [OldModelName]_Alb.0 to [NewModelName]_Alb.0 and [OldMaterialName] to [NewMaterialName] (e.g. Mt_Hood_001 to Mt_Hood_9001). Save it, then, back in Switch Toolbox, right-click on the folder inside Texture Pattern Animations that corresponds to your item, and select Replace. Select the yaml you edited.
When you are done, select any file or folder from the model sbfres, in the list on the left, and save it. Switch Toolbox will ask if you want to Yaz0 compress the file, click Yes. Then click on any file or folder from the texture sbfres, in the list on the left, and save it. Switch Toolbox will again ask if you want to Yaz0 compress the file, click Yes. If you are editing a WiiU texture sbfres, it will then ask you to save the Tex2 sbfres, so save it and Yaz0 compress it, as well. And that's it, you are done with the files that tell the game what the new item looks like.
Creating an inventory icon
This section covers the inventory icons, the square images you see in the inventory grid in the pause menu. These files are kept in content\UI\StockItem for inventory items. Copy the old sbitemco file for the item you are using as your foundation, to the same location in your mod files (content\UI\StockItem). An sbitemco file is pretty much the same thing as an sbfres for textures, so you will edit it the same way, using Switch Toolbox. Make sure to change the name of the file to [NewActorName].sbitemico, the name of the file it contains in Toolbox to [NewActorName].bitemico, and the texture it contains to [NewActorName]
Creating an inventory name and description
For the in-game text concerning your item, you will need to navigate to content\Pack\Bootup_[XXxx].pack\Message\Msg_[XXxx].product.ssarc. There are many msbt files here, and all of them have text data for the game. For your actor, you'll look in the ActorType folder. Find the file that fits your item type, and open it in your text editor of choice.
Find the name and description entries for the item you used as your base, and copy them to the bottom of the file. An entry in this file starts on the line that says [ActorName]_Name or [ActorName]_Desc and ends one line before the next time that appears. If your item is something that would appear in the Shiekah Slate album, so that you could take pictures of it and track it on the map with the Sheikah Radar, also add an [ActorName]_PictureBook.
Change the - text: line of the name to be your new name, and the - text: line of the description to be your description. If your name or description uses apostrophes, be sure to surround it in quotes. e.g. Zora Mask is fine, but "Zora's Mask" needs the quotes because it contains an apostrophe. If you have a picture book entry as well, copy the text you made for [ActorName]_Desc into it.
When you're done, make sure to save.
Converting back
Now that almost all the files have been edited, you will need to pack them all back up. Go back to the folder that contains BreathOfTheWild_[MyAwesomeModName]_unbuilt, open a Powershell window, and run the command hyrule_builder build [--be] BreathOfTheWild_[MyAwesomeModName]_unbuilt. If you are modding for WiiU or Cemu, add the --be. If you don't, the error you get will seem very confusing. This is because it's looking for the Switch paths and not finding them. After a little bit of conversion, a new folder will be created, called BreathOfTheWild_[MyAwesomeModName]_unbuilt_build. That folder contains your completed mod. Delete the old BreathOfTheWild_[MyAwesomeModName] and rename the completed mod folder to BreathOfTheWild_[MyAwesomeModName].
Creating the save game data flags
You should ignore this section if you are making something that never goes into Link's inventory.
This section covers the save game flags, which the game uses to remember certain things about your item. If you are adding a common item, like a material or consumable, this will make it so that the little popup that happens the first time you pick up an item, doesn't happen every single time you pick your new item up. It also remembers other things, like whether or not a picture has been taken of your item, whether or not you decided to save that picture, how big the picture is, how long it's been in your inventory, and how long you've had it equipped.
Navigate to the folder that contains your BreathOfTheWild_[MyAwesomeModName] folder you made, open a Powershell window, and run the command botw_flag_util generate BreathOfTheWild_[MyAwesomeModName] -a [-b]. If you are modding for WiiU or Cemu, add the -b. If modding for Switch, don't add it. If you run it the wrong way by accident, just run it again the right way. It will let you know that nothing changed, and then write the file for the other console.
Installing the mod
And now you are done! Basically! Use the directions located here to make a rules.txt if you haven't already. To use the mod, open bcml via Powershell (just run the command bcml) and select Install... Then select Add Folder, select the BreathOfTheWild_[MyAwesomeModName] folder, and click OK. Wait for it to install, and you're ready to play the game with your new item!
Troubleshooting
My actor isn't appearing in the game!
Make sure the actor's info entry (part 5 of the tutorial) is correct. Formatting is important here. It's also important to make sure your actor's name is valid. If it isn't, the game won't know what to do with it, so it won't create it. For example, weapons need to be named Weapon_[WeaponProfile]_[AnythingElseYouWant], while armors need to be named Armor_[ThreeDigitNumber]_[AnythingElseYouWant]_[Head/Upper/Lower] (Except Armor_001_Head or Armor_001_G_Head both work, but Armor_001__Head doesn't because it has two underscores between 001 and Head)
My weapon/armor actor is appearing in my inventory, but it doesn't equip and disappears if I try to drop it from my inventory!
This one's difficult: Something, somewhere, in the actor or in one of the resource files, is broken. It could be just about anything except for the text and flags. Whenever the game encounters something it doesn't expect, it silently fails and doesn't create the actor, but doesn't tell you why. There isn't really any better way to pinpoint what could be causing the issue.
My game is crashing when loading the item!
Another difficult one, but typically this is because the way you placed the item in the world (which is not covered by this tutorial) was wrong, or, if it's crashing when equipping it (if an item) or when loading it into the world (if it's a field object), it's because the model is broken. Check the model replacement tutorial for info on the "vertex buffers" and what to do about them.
My game is crashing after shaders compile!
Depending on how many mods you have installed, the number of game data flags your game has can cause it to crash. The game loads all flags into a special section of memory when booting up, and if too many flags are loaded, the game doesn't have enough memory to hold them all, and crashes. The Wii U version is limited to about 650 more flags than the vanilla game has. We don't know the limit of the Switch version, but we do know that it is much higher, due to the much larger amount of memory the Switch has.
Alternatively, the Resource system may have not been edited correctly, or it may be getting overridden by a file from another mod, if you're using more than one (or not using BCML to install all of your mods). 99.9% of the time, BCML will generate things correctly, but if you've ruled out every other option, then check the BCML merged mod's RSTB entries against those found in BCML's data folder's log files.