Help:Replacing models: Difference between revisions
→Obtaining a Rig: Add vertex buffers image |
|||
| (2 intermediate revisions by the same user not shown) | |||
| Line 48: | Line 48: | ||
<blockquote>Summary: Apply the rig from the original object(s) to your object(s). Set maximum limit for bones to affect vertices to the object's skin count.</blockquote>For 3ds Max: Select the original object's Skin modifier in the modifier list, then copy it. Select your object, then paste the rig onto it. If all has gone well, you're done with this step. 3ds Max uses one or more of a series of algorithms to map the rig of one object onto the rig of another object automatically, and it's generally pretty good about it. | <blockquote>Summary: Apply the rig from the original object(s) to your object(s). Set maximum limit for bones to affect vertices to the object's skin count.</blockquote>For 3ds Max: Select the original object's Skin modifier in the modifier list, then copy it. Select your object, then paste the rig onto it. If all has gone well, you're done with this step. 3ds Max uses one or more of a series of algorithms to map the rig of one object onto the rig of another object automatically, and it's generally pretty good about it. | ||
For Blender: | For Blender: | ||
* Click and drag the object on top of the original object's Armature (the one with the orange upside-down triangle next to it), while holding shift and alt. This will assign the object to that armature, instead. Then, select the object in Object mode, go to the Modifiers tab (which looks like a diagonal wrench, in the bottom right area), click on the box next to Object, and select the armature of the original model. | * Click and drag the object on top of the original object's Armature (the one with the orange upside-down triangle next to it), while holding shift and alt. This will assign the object to that armature, instead. Then, select the object in Object mode, go to the Modifiers tab (which looks like a diagonal wrench, in the bottom right area), and in the box that says Armature at the top, click on the box next to Object, and select the armature of the original model. If there is no box that says Armature at the top, click on Add Modifier and select Armature. There is now a box that says Armature at the top. | ||
* Select your object in Object mode. In the bottom right, click on the upside-down green triangle. If there is anything in the Vertex Groups tab, delete it all with the - button. Then, Ctrl+click the original object that most closely matches its location. Go into Weight Paint mode, click on the Weights button in the top left, and select Transfer Weights. In the bottom left, expand the new small tab there, if it is not already. For Vertex Mapping, select Nearest Face Interpolated. For Source Layers Selection, select By Name. For Destination Layers Matching, select All Layers. | * Select your object in Object mode. In the bottom right, click on the upside-down green triangle. If there is anything in the Vertex Groups tab, delete it all with the - button. Then, Ctrl+click the original object that most closely matches its location. Go into Weight Paint mode, click on the Weights button in the top left, and select Transfer Weights. In the bottom left, expand the new small tab there, if it is not already. For Vertex Mapping, select Nearest Face Interpolated. For Source Layers Selection, select By Name. For Destination Layers Matching, select All Layers. | ||
| Line 110: | Line 110: | ||
====Does this work for TitleBG.pack models?==== | ====Does this work for TitleBG.pack models?==== | ||
Yes. There's no functional difference between resident actors (those in TitleBG.pack, denoted by their presence in Bootup.pack's ResidentActors.sbyml file) and normal actors, save that resident actors are always loaded in memory, so they can be displayed without loading delays. This also means that if you've done something wrong, you'll notice the crashing at the title menu or first loading screen, instead of during gameplay. | Yes. There's no functional difference between resident actors (those in TitleBG.pack, denoted by their presence in Bootup.pack's ResidentActors.sbyml file) and normal actors, save that resident actors are always loaded in memory, so they can be displayed without loading delays. This also means that if you've done something wrong, you'll notice the crashing at the title menu or first loading screen, instead of during gameplay. | ||
====Why does the lighting on my model look weird?==== | |||
If you obtained your model - that is, the modded one that you are adding to the game - by extracting it using Switch toolbox as a DAE, then Blender versions from before Sept 24 2022 will fail to read vertex normals on import, and instead generate new ones. This is almost always undesirable, and will result in weird, splotchy shadows on your model. To fix this, update Blender. | |||
If you really don't want to update Blender for whatever reason, use the latest AutoDesk FBX Converter (available [https://aps.autodesk.com/developer/overview/fbx-converter-archives here], yes the latest version is from 2013) to convert the DAE to FBX first. | |||
Not that it's not necessary to convert the rig model, because you delete it. You only need to convert the final model that you will be importing. | |||
Note that once the vertex normals are messed up, converting to FBX won't fix anything. You have to convert it before the first time you transfer the working model from Switch Toolbox to your modeling program. | |||
===Object Placement Issues=== | ===Object Placement Issues=== | ||
Latest revision as of 13:03, 12 February 2025
Model replacement is the process of changing the shape of an entity (weapon, character, etc) to a custom shape, either created by you or by someone else. Examples of model replacements include the Zelda and Linkle replacement mods.
This tutorial assumes you either have a model already, or will be editing one of the in-game models. It also assumes you will be replacing an in-game model, not making a new one. Pictures dealing with modeling programs are taken in 3ds Max, but similar options should be available in your program of choice.
Required Tools
Model replacement in Breath of the Wild requires a set of tools. These tools will vary somewhat, based upon your personal preference, but the tools below are currently the most effective for properly modding the game.
- Switch Toolbox (Yes, even if you are using WiiU or Cemu)
- A 3D modeling program of your choice (common choices are 3ds Max and Blender)
- (optional) If you are using 3ds Max, the CSV export script
- (optional) If you are using 3ds Max, the BFRES importer MaxScript may be helpful. (expand the "Wii U & Nintendo Switch - BFRES importer (originally by ItsEasyActually)" to find it)
- (optional) BotWUnpacker
Tutorial
Obtaining a Rig
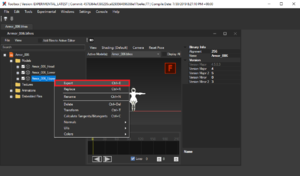
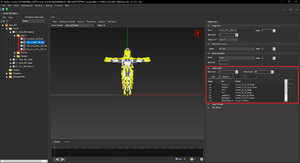
Summary: Export a model from the SBFRES you want to use, using Switch Toolbox. Take note of the skin count and the vertex buffers and formats.
A "rig" or "skeleton" is a set of "bones" that animations use. Every model is made up of several pieces: objects (which tells the game how to make the model in 3D), materials (which tell the game what the model should look like), and the rig (which tells the game how the model moves during animations). If you were to consider a door, the objects would be the rectangle for the main door and sphere of the knob, the materials would be the wood grain and brown coloring of the door and silver reflective surface of the knob, and the rig would be what tells the game that the knob rotates and the door swings inward.
In order to obtain a rig, you should find the SBFRES archive for the model you wish to use a rig from. Most models are contained in the game files in the content\Model folder. Once you've chosen your SBFRES, copy it to a safe place away from the game files, so you don't accidentally modify any of the original game's files.
Open Switch Toolbox, select File -> Open from the toolbar, and select your SBFRES. On the left side, expand the only available option, and then expand Models. Right-click on the model you need and select Export. If there are multiple options, pick as many as you need. For example, if you are replacing an entire armor set, you would export all three models, but if you were only replacing one piece of the armor, you would export just that piece. Export it as a DAE file. Switch Toolbox will ask if you want to export textures. It's not needed, but it doesn't hurt.
Next, expand the model(s) you are exporting, expand the Objects folder, and select each object in turn. On the right side of Switch Toolbox, you'll see a collapsed section labeled Vertex Buffer. Expand it. In this section, you will see several important things: the skin count, the vertex buffers, and the buffer formats. It's not important to know what all of these things mean if you don't wish, but take note of what they are for every object that you'll be replacing. Screenshots or a text file work well for saving this info. It will be important later.
Note: if you wish to export all the models in an SBFRES quickly, right-click on the Models folder instead and select Export All.
Import the Original to Your Workspace
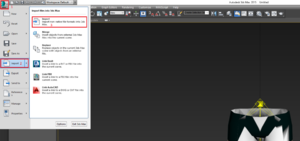
Summary: Import the DAE into a shared workspace with your model, so that the object list has your objects, the original objects, and the original skeleton.
Open your 3D modeling program of choice, and bring your replacement model into the workspace. Then, go to File -> Import, and import the DAE model you extracted from the SBFRES. If you exported multiple models, only import the model you are currently working with. For example, if you exported an entire armor, you should only import the legs (or whatever part you are working with). Once you have finished the "Export Your Rigged Model" step, return here to repeat the process for other models.
You may see errors when you import with 3ds Max - this is normal, you can ignore them. Blender suppresses these errors, so you won't see them. Combine the original model's objects, roughly along the lines of how your objects are. For example, if the original model has separate fingers, hands, and arms, and your model has separate hands and arms, combine the fingers with the hands. Or if your model is only a single object, combine all the original model's objects into a single object. In 3ds Max, you can do this with Command Panel -> Modify -> Edit Geometry -> Attach, and selecting the object to attach the selected object to. In Blender, you can do this by selecting multiple objects with Ctrl+click in Object mode, then right-clicking and selecting Join.
In your object list, you will now see the original model's objects along with your objects. You will also see the original model's skeleton, which is important to have and you should generally not touch it.
Align Your Model With the Original
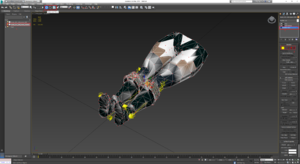
Summary: Get your objects to match up with the original ones, as close as possible. Anything delicate is important: feet, hands/fingers, waists, necklines, handles of weapons, etc.
In all likelihood, your model will differ greatly from the original you just imported. Using the Move, Rotate, and Scale tools, make sure your model lines up with the original's - the closer the better.
There are also plenty of tools in 3ds Max's Edit Poly/Mesh modes, or Blender's Sculpt mode for helping move the model around. In 3ds Max, you can right click on the Edit Mesh/Poly to convert between them. In Blender, one of Sculpt mode's tools is the Pose tool, which is quite good for moving limbs into place if you're modifying an armor.
Rename your objects to something close to the original's, so that you can easily figure out which of your objects corresponds to which original object. This will help both during this step and later, during the "Replace the Original Model with Yours" step. For example, if you have an object for hair, it's encouraged to name it Hair_###__Mt_Hair_###, where ### is the number of the armor you might be working with, and Mt_Hair_### is the name of the material you want to use with it. Including the name of the material in the object is helpful so that when you need to reassign materials in Switch Toolbox (which you may have to do often, depending on how much trouble you have) you will be able to tell, straight away, which object needs which material.
Note: If you need help with this step, there are many great tutorials on YouTube.
Apply the Rig from the Original to Your Model
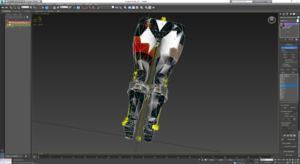
Summary: Apply the rig from the original object(s) to your object(s). Set maximum limit for bones to affect vertices to the object's skin count.
For 3ds Max: Select the original object's Skin modifier in the modifier list, then copy it. Select your object, then paste the rig onto it. If all has gone well, you're done with this step. 3ds Max uses one or more of a series of algorithms to map the rig of one object onto the rig of another object automatically, and it's generally pretty good about it.
For Blender:
- Click and drag the object on top of the original object's Armature (the one with the orange upside-down triangle next to it), while holding shift and alt. This will assign the object to that armature, instead. Then, select the object in Object mode, go to the Modifiers tab (which looks like a diagonal wrench, in the bottom right area), and in the box that says Armature at the top, click on the box next to Object, and select the armature of the original model. If there is no box that says Armature at the top, click on Add Modifier and select Armature. There is now a box that says Armature at the top.
- Select your object in Object mode. In the bottom right, click on the upside-down green triangle. If there is anything in the Vertex Groups tab, delete it all with the - button. Then, Ctrl+click the original object that most closely matches its location. Go into Weight Paint mode, click on the Weights button in the top left, and select Transfer Weights. In the bottom left, expand the new small tab there, if it is not already. For Vertex Mapping, select Nearest Face Interpolated. For Source Layers Selection, select By Name. For Destination Layers Matching, select All Layers.
After applying the rig onto an object, set the limit for the number of bones to affect each vertex to 4. In 3ds Max, you can do this by scrolling the modifier rollout on the right side down to the bottom, expanding Advanced Parameters, and setting the number in the Bone Affect Limit box. In Blender, you can do it with the Limit Total option, found right under the Transfer Weights option described earlier. Other programs will have different ways of setting this limit.
You also want your weights to be normalized. In 3ds Max, the weights are normalized by default. In Blender, in Weight Paint mode, you need to click on the screwdriver-and-wrench icon in the middle of the right side, expand Options, and select Auto Normalize.
If you get the model into the game and the animations deform the model in strange ways, you'll need to come back and manually adjust the rigging, which is a very time-consuming process, documented in a number of excellent tutorials on YouTube.
Delete the Original Model's Objects
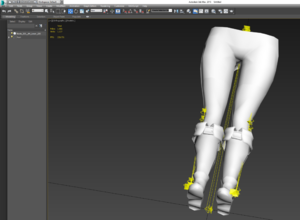
Summary: Delete the original model's objects and your model's skeleton (if any), leaving just your objects and the original skeleton. Rename your objects.
Delete all the objects from your workspace that you don't want to be imported to the game. This includes any secondary objects not part of your final model, your model's skeleton (but not the original model's skeleton), and the original model's objects.
It's also a good idea to rename the your objects to names that describe what they are for. In Blender, renaming the upside-down orange triangle doesn't do it, you have to expand that and rename the upside-down green triangle. Though this isn't strictly necessary to get the replacement model to work, it can really help smooth things out later.
Export the Model from Your Modeling Program
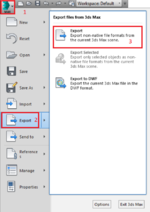
Summary: Fairly simple, export your model. DAE is probably best.
Using File -> Export, export your model as whatever type you wish. Switch Toolbox, as of writing this guide, only handles DAE properly. It has an option for FBX as well, and as it receives updates regularly, FBX or other formats may become properly handled at any time.
It also has an option for importing via CSV (which is not a model type) that is explained in the optional step, below. CSV is only recommended if your exporter cannot export DAE or FBX for whatever reason.
Switch Toolbox now handles DAE's from Blender just fine, so there is no longer any need to use Autodesk FBX Converter, as was originally described here.
Export the Model using CsvExportRewrite
Summary: In 3ds Max, use MAXScript -> Run Script... to run CsvExportRewrite.ms and save the model data as a CSV file.
Some people - the author included - have trouble with 3ds Max crashing when it tries to export models. For us, there is a MAXScript that exports the model as text, which Switch Toolbox can also use. In the toolbar use the MAXScript menu and select Run Script. Select the CsvExportRewrite script. A small box will pop up with a list of all the objects in your workspace. It has options to "Copy UVs" and "Explicit Normals" for each object. Copy UVs is disabled by default, and Explicit Normals is enabled by default. These settings should suffice, though if you end up with strange textures in game, try re-exporting with Copy UVs checked.
When you select export, 3ds Max will stop responding for a little bit as it exports, then it will respond again. When it responds, check the csv file it created. If it is empty, go through all of your objects, collapse or delete any modifiers that aren't the Skin modifier, Edit Normals modifier, or Editable Mesh, then select the Skin modifier for every object so that the modifiers background is dark grey (not blue), and then export again to a different file. It will fail again if you try to export to an empty file it has previously created, unless you've restarted 3ds Max since it created that file.
Import the Model Using Switch Toolbox

Summary: Replace the original model in Switch Toolbox.
If you didn't leave Switch Toolbox open, reopen it now, and reopen the SBFRES you got the original model from. Right-click on the model that you want to replace, select Replace, and select the file you exported from your modeling program.
A dialog window of import options will appear. The picture to the right contains settings for most armors, but you should generally match the formats you copied down in the first step of this tutorial.
Red box: Generally leave these unchecked. If your textures look all funky, try reimporting with Flip UVs. If you import and the model is not looking at you, but is instead face-down, reimport with Rotate -90 degrees checked. If you import and the model is face-up, use Rotate 90 degrees. If you modified the skeleton, use Import Bones. (It's possible that skeletons exported from Blender may not import correctly if you don't export as FBX.)
Orange box: Keep Original Skin Count will be disabled by default in order to help avoid model stretching issues, but if your weights did not change then you can check this box to help solve some issues. Always check Map Original Materials. If you are importing from DAE or FBX, then you should check Use Original Attributes and Use Original Attribute Formats. If you checked those boxes and changed the names of the objects from the original model, pay special attention to the teal box instructions below. If you check those two boxes, then you can ignore the green and yellow box instructions below.
Green box: Check all the boxes corresponding to the buffer types that you took note of in the first step of this process, "Obtaining a Rig." If any object has one of those buffer types, check the box.
Yellow box: Select formats from the dropdowns that correspond to the formats you took note of in the first step of this process, "Obtaining a Rig." If the UVs format was Format_16_16_UNorm and the dropdown does not have that option, Format_16_16_SNorm is fine.
Teal box: If you are importing from DAE or FBX, then the left side will have the objects you are importing, and the right side will have the objects you are replacing. This will let you know whether or not Map Original Materials from the orange box will actually do anything, and is one of the reasons why you renamed your objects to the same name as the originals. If you did not rename your objects to the same names as the originals in your modeling program, then you may rename them to the original object names here by selecting them on the left side and correcting their names in the text line above these two boxes. This will save you the trouble of having to set the attributes and formats manually (the green and yellow boxes). The CSV import option does not support Map Original Materials at the time of writing, though it may do so in the future.
Once you've set all your import options, switch back to the Model Settings tab and hit Save.
Verify the Model Looks Good and Save
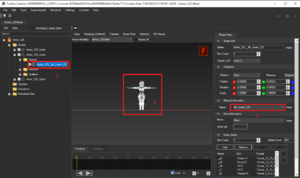
Summary: Check the model in the viewer for dropped weights, and check the material assignments. If it all looks good, save it.
Double check the model in the viewer to ensure that it has imported correctly. If it is face-down on its front or face-up on its back, reimport it. If pieces of the model are stretching to the "origin" (the center of the viewer space), then some vertices weren't properly weighted and you need to find them and re-rig them. If the model is wavy, where it should be straight, then you probably imported with 16 bit or 32 bit weights, and need to reimport with Blend Weights format Format_8_8_8_8_UNorm.
Also verify that the material assigned is the correct one. If you imported from a CSV file, these will almost certainly be wrong. This step is another reason we renamed the objects to the original names: the original names have the material name at the end, so there isn't confusion as to what object owns what material. A single material may be assigned to multiple objects, but any object may only have a single material.
Lastly, verify that the vertex buffers list for each object contains all of the same entries as the original object did (you should still have the list from the beginning of this process). If any buffers are missing, reimport the model and check the boxes for those buffers. If they are still missing, your model format does not contain that information (OBJ) and you should use a different format. If there are buffers that the original object did not have, select them and click Remove, then click Yes when it asks if you're sure.
Once all that is done, you're all set. Hit save. Your SBFRES now has your custom model and is ready to be loaded into the game!
Troubleshooting
General
Does this work for TitleBG.pack models?
Yes. There's no functional difference between resident actors (those in TitleBG.pack, denoted by their presence in Bootup.pack's ResidentActors.sbyml file) and normal actors, save that resident actors are always loaded in memory, so they can be displayed without loading delays. This also means that if you've done something wrong, you'll notice the crashing at the title menu or first loading screen, instead of during gameplay.
Why does the lighting on my model look weird?
If you obtained your model - that is, the modded one that you are adding to the game - by extracting it using Switch toolbox as a DAE, then Blender versions from before Sept 24 2022 will fail to read vertex normals on import, and instead generate new ones. This is almost always undesirable, and will result in weird, splotchy shadows on your model. To fix this, update Blender.
If you really don't want to update Blender for whatever reason, use the latest AutoDesk FBX Converter (available here, yes the latest version is from 2013) to convert the DAE to FBX first.
Not that it's not necessary to convert the rig model, because you delete it. You only need to convert the final model that you will be importing.
Note that once the vertex normals are messed up, converting to FBX won't fix anything. You have to convert it before the first time you transfer the working model from Switch Toolbox to your modeling program.
Object Placement Issues
My eyes are in the model's head, but they aren't in game!
Splitting the eyes into two different objects may help to fix this. If not...
Eyes are very strange. Link's original eyes are placed correctly, but exporting them will cause them to be placed incorrectly in any 3d modeling program, and reimporting unchanged eyes will cause them to appear in a different place. However, the game will load them as if they were in the correct place. It is generally not advised to move the eyes unless absolutely necessary, as there is no single way to make them work consistently.